Integration of Microsoft Purview and Power Automate (Part 2)
In the second part of our series Leveraging Power Automate with Microsoft Purview were going to do a walkthrough of configuring Purview Communicat...

In the second part of our series (Leveraging Power Automate with Microsoft Purview), we’re going to do a walkthrough of configuring Purview Communication Compliance with Power Automate.
Part 1: Leveraging Power Automate with Microsoft Purview (Part 1)
Part 2: Integration of Microsoft Purview and Power Automate (this post)
Part 3: Integrating Microsoft Purview and Power Automate: Implementation Best Practices
The Scenario
As an organization, we want to capture and act if there is any communication that include Offensive or threatening language. This is key to maintaining a professional and acceptable place of business. This can include people inside of the business and outside. When this happens, we want to notify the manager and in this case our security team as well. Expanding this scenario, it’s obvious that this should go to Human Resources as well. However, we’ll keep it simple from this post.
Requirements & Recommendations
For this to all work, you’ll need the following:
Licensing
Both Power Automate and Purview Communication Compliance are license that are bundled with the following:
- Microsoft 365 E5/A5/F5/G5 subscription (paid or trial version)
- Microsoft 365 E3/A3/F3/G5 subscription + the Microsoft 365 E5/A5/F5/G5 Compliance add-on
- Microsoft 365 E3/A3/F3/G5 subscription + the Microsoft 365 E5/A5/F5/G5 Insider Risk Management add-on
There are other options as well. Links to those resources are later in this post under “References.” These can be complex and where Agile IT can help with your licensing needs.
Roles and Permissions
Not going to go deep here, but if you’re doing development of this and following along, you’ll need this access OR work with a peer/team to configure the Purview Policies as needed. As we go along, we’ll try to call these out.
It typically starts with “Compliance Administrator” setting this up. This is done via Entra ID (aka Azure Active Directory). When Communication Compliance is being used, you’ll configure within Purview which people or security groups will be assigned to the roles that it understands.
Purview Communication Compliance Policy
First, we’ll want to create a policy specifically to handle the scenario where Purview is watching for this kind of interaction. There is a default template for this and maybe you have your own, but we’ll walk through what is configured for this scenario to work for us.
Step 1: Create a new Communication Compliance policy
First, let’s navigate to the Communication compliance policy section
As you can see below, there are a few pre-defined policies to select. We’ll use “Custom”

Here is where you’ll name the policy and give it a description.

Click Next (not shown in screenshot). Now we can select the users that his applies to, who to exclude, and who can review the communication from those that meet the conditions. We won’t go into all of that for this post.

Click Next (not shown in screenshot). We can now specify where we want to detect this information to apply the policy. Here, we selected all three in Microsoft 365: Exchange, Teams, Viva Engage.

Click Next (not shown in screenshot). Lastly, we set the conditions and direction of this information.

Click Next (not shown in screenshot). Now we can review all we configured. We can even see it has a recommendation. The below screenshot doesn’t include all on the page, but enough for you to get the point of it.

Click Next (not shown in screenshot). And then click Done.
At this point, we have what we need. You’ll later see in the dashboard that the status is “Activating” which could take a few hours.
Create Power Automate
Now let’s go through the steps of creating a Power Automate that works with the information from Purview.
We’ll walk through the main parts, but this won’t be a click by click set of instructions. However, you’ll have enough detail to create this on your own.
Step 1: Create a new Power Automate Flow
Let’s name it: Purview Communication Compliance Violation
Step 2: Add a trigger
A trigger is the starting point for our flow. We’re going to use a trigger that’s within the “Microsoft 365 compliance” connector.

Click, “For a selected communication compliance item”

Nothing else to do with the trigger. Let’s move on to adding some actions to handle the information provided by the trigger.
Step 3: Get the metadata for the violation
Add the action “Get communication compliance violation metadata” which is also in the “Microsoft 365 compliance” connector. The trigger just says that something happened, but now we want to actually get the details about the violation.

In order for the metadata to understand which item kicked off the trigger to fetch the actual metadata for it, we’ll use “dynamic content.” We’ll do this in other places as well. This post isn’t a full class on how to do Power Automate, so we’ll start to summarize things, but the pictures should provide more context.

In the above screenshot, you’ll see that the trigger is provide us some dynamic content.
Once we’ve populated the metadata action to pull information based on the item that kicked off the trigger, let’s work on communicating this issue.
Step 4: Get the managers information
Now this is where there are a few tricks to use for this scenario. We want to send a message to the manager of the user and our SOC team. But what if the user doesn’t have a manager? Maybe it’s just not set in Entra ID (aka Azure Active Director), it’s a guest user, or the violator of the policy is a guest. Whatever the case, they don’t have a manager assigned. So we need to handle that.
To do this, we’re going to use “section” which is part of the “Control” connector within Power Automate. Soon, you’ll see why.

Now let’s add in the Scope action.

We’ll now rename the action itself so that it helps with our documentation of this. Let’s name the action “Try- Get Manager”

Once you’ve completed that step (no screenshot with just that part), we’ll want to add an action to get the manager for the user.
Step 5: Get the Manager
To get the manager of the user, we’re going to use the “Office 365 users (v2)” connector and use the “Get manager (V2)” action.

Next, we’ll want to configure the action to pull the manager based on the user that created the violation. We’ll leverage Dynamic Content again to connect the dots here.

As you can see in the screenshot above, we’re taking the Dynamic Content of “violatedUserEmail” from the “Get communication compliance violation metadata” action and then adding that to the “Get manager (V2)” action.
The reason we put this in a scope, is that if/when this fails because the user doesn’t have a manager set, then we want to make a decision what to do without the entire flow breaking.
Step 6: Take action if there is no manager
Let’s add our next action which is to send a message to our SOC team even if there is no manager.
First, add a new Scope action and rename to “No Manager Found”
We’re now going to add an action that leverages the “Microsoft Teams” connector.

And we’re going to use the “Post message in a chat or channel” action.

We’re going to send a message using the flow bot, into a channel named, “SOC Team” within the “General” channel. We can customize the message and include information about the violation. You can see in the screenshot below that we’ve put in some text and some dynamic content.

Last step here is to finally put our “Scope” components to work!
On the “No Manager Found” scope, click on the three dots and select, “Configure run after” like the screenshot below.

This is where we’ll configure the “No Manager Found” scope to run ONLY if the “Try- Get Manager” scope fails.

Step 7: Take action if there is a manager
To fast forward, create a new scope named, “Has Manager” and then we’ll add the “Post message in a chat or channel” action within the “Microsoft Teams” connector. Also, rename the action to “Post message to manager”
Then you’ll add and configure the same “Post message in a chat or channel” in the “Microsoft Teams” connector right afterwards. Also, rename the action to “Post message to SOC”
Now you should look like the following.

Nothing new here since you’ve been following along. However, you can see that our message to the SOC Team provides additional dynamic content that came from the “Get manager (V2)” action.
Lastly, we need to configure the “Has Manager” scope to only run IF the previous action (in this case our scope if there was no manager) is skipped.

“Has Manager” should run after “No Manager Found” has been skipped.

That’s it! But now we need to see it in action.
Test
Now that we have our flow, we want to test this out. Let’s go back to Compliance Center and put this thing to work. While we’re testing this out per violation, the automation will run as new violations occur.
We can see here that our policy has four pending issues. This is great for testing this out.

After clicking on the policy, let’s select one of the violations.

In this example, Alex Wilber is not being very nice. After selecting that violation, click on the “Automate” button that’s highlighted in the navigation bar as shown in the screenshot above.
Now we’ll get a sidebar menu where we can see other Power Automate flows that uses a connector that Purview Communication Compliance understands and even a template. It kinda looks like what we built here, but ours/this is better. 😊
Click on the “Run flow” dropdown and then select our flow.

Now you’ll see that it’s check to ensure that the flow that will run has the permissions required. That’s not covered in this post.

Scroll down (I have to say it because if your browser window is a bit small, you won’t see the “Continue” button. And click “Continue.” And then “Run flow.”

Now that flow is running, let’s go back to Power Automate and see it in action!
When we first open our flow, we’ll see some good news waiting for us!

Go ahead and click on the date so we can inspect what happened.

One thing you can see is that it looks like the user had a manager assigned. Thus, the “No Manager Found” was skipped. And to show you a little of the final output, this even shows you the output of data from this flow.
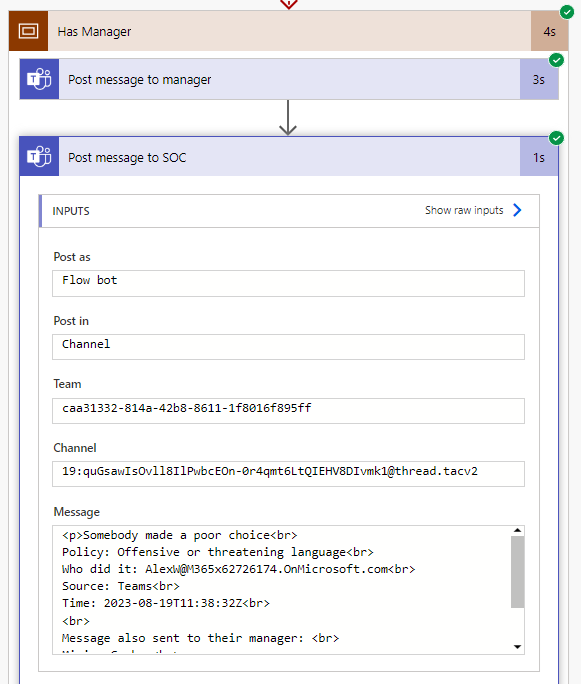
Now let’s check out the SOC Team via Microsoft Teams to see what the output was there.
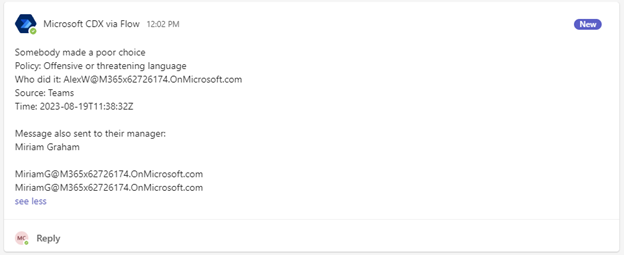
As you can see, the post to the SOC team was posted by the flow bot exactly as we expected.
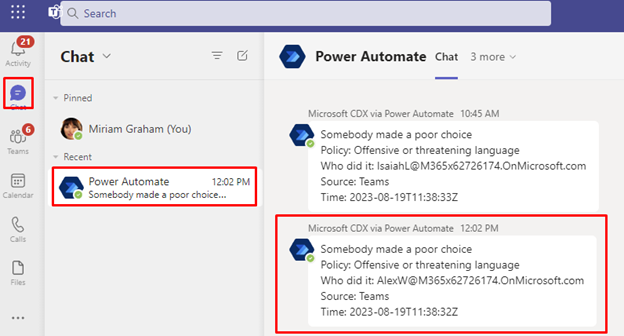
Finally, let’s see what the manager (Miriam Graham) see via Microsoft Teams.
Conclusion
Purview is a powerful service that allows organizations to define corporate or industry compliance policies to reduces a variety of risks and penalties. Leveraging Power Automate with Purview can capture specific tasks and route them to the right people and teams to act. This reduces the burden of the IT and/or Compliance team to be the only one’s looking and then taking manual actions.
References:
- Get started with communication compliance: https://learn.microsoft.com/en-us/purview/communication-compliance-configure
- Power Automate Connectors
- Microsoft 365 compliance: https://learn.microsoft.com/en-us/connectors/microsoft365compliance/
- Microsoft Purview Communication Compliance licensing: https://learn.microsoft.com/en-us/purview/communication-compliance-configure#subscriptions-and-licensing
