Walkthrough: Enable Hyper-V Role on Azure
Great post on enabling and uploading HyperV Virtualization and uploading your VMVHD filesStep 1 Get your certificatesI assume that yo...

Great post on enabling (and uploading) Hyper-V Virtualization and uploading your VM/VHD files
Step 1: Get your certificates
I assume that you have an active Azure subscription and you have installed visual studio 2010, the azure sdk and tools and activated the VM role. You will need a management certificate for your subscription to deploy services and 1 or more service certificates to communicate with those securely. To generate a x509 certificate for use with the management API:
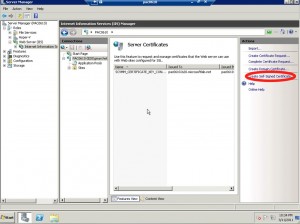
1. Open the IIS manager, click on your server.
2. Select “Server Certificates” in the main panel.
3. Click “Create Self-Signed Certificate” in the actions panel

4. Give the certificate a friendly name.
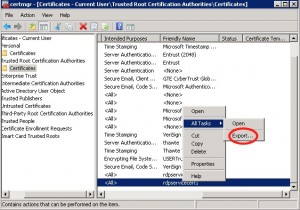
5. Close IIS manager and run certmgr.msc
6. Find your certificate in “Trusted Root Certification Authorities”
7. Right-Click on it, select All Tasks / Export

8. Do not export the private key, choose the DER format, give it a name.
9. Navigate to the Windows Azure management portal.
10. Select Hosted Services / Management Certificates / Add a Certificate
11. Browse to the management certificate file and upload it.
Step 2: Prepare the VM
I assume that you are familiar with Hyper-V and how to build a virtual machine on a hyper-v host.
-
Create a virtual machine on hyper-v. Note that the maximum size of virtual hard disk you specify will determine what size of Azure VM you will be able to choose. An extra-small machine will mount a vhd up to 15 GB, small one up to 35 and medium or more up to 65 GB. This is just the size of the system VHD. You will still receive local storage, mounted as a separate volume.
-
Install Windows Server 2008 R2 on the VHD. It is the only supported o/s as of writing.
-
Install the Azure integration components in the VM. They are contained in the wavmroleic.iso file, which is typically located in c:progam fileswindows azure sdk<version>iso. You need to mount that file on the VM and then run the automatic installation process. This provisions the device drivers and management services required by the Azure hypervisor and fabric controller. Note that the setup process asks you for a local administrator password and reboots the VM. The password is encrypted and stored in c:unattend.xml for future unattended deployment.
-
Install and configure any application, role or update as you normally would.
-
Configure the windows firewall within the VM to open the ports that your application requires. It is recommended that you use fixed local ports.
-
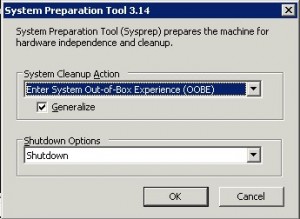
Open and administrator command prompt and run c:windowssystem32sysprepsysprep.exe
-
Select “OOBE”, Generalize and Shutdown

This process removes any system-specific data (including the name and SID) from the image, in preparation for re-deployment on Azure. If your application is dependent on those data, you will have to take appropriate measures at startup on Azure (e.g. run a setup script for your application). The VHD is now ready to be uploaded. It is recommended to make a copy of it to keep as a template.
Note that any deployment to Azure starts from this vhd. No status is saved to local disk if the Azure VMs is recycled for any reason.
Step 3: Upload the VM to Azure
For this you will need a command-line utility provided with the Azure SDK.
- Open a windows azure command prompt as administrator.
- Type
csupload Add-VMImage -Connection "SubscriptionId=<YOUR-SUBSCRIPTION-ID>; CertificateThumbprint=<YOUR-CERTIFICATE-THUMBPRINT>" -Description "<IMAGE DESCRIPTION>" -LiteralPath "<PATH-TO-VHD-FILE>" -Name <IMAGENAME>.vhd -Location <HOSTED-SERVICE-LOCATION> -SkipVerifyThe subscription ID can be retrieved from the Azure portal and the certificate thumbprint refers to the management certificate you created and uploaded before. The thumbprint can be retrieved from the portal as well. The description is an arbitrary string, the literal path is the full absolute path on the local disk where you stored your vhd. The image name is the name of the file once stored in Azure and the location is one of those available in the Azure portal. Note that the location must be specific, e.g. “North Central US”. A region is not accepted (e.g. Anywhere US). SkipVerify will save you some time.
This command will create a blob in configuration storage and load your vhd file in it for future use, but not create a service or start a VM for you. In the Azure portal the stored virtual machine templates can be found under “VM Images”

Step 4: Prepare the service model
Read the second half @> Put a VM on Azure - HPC, Virtualization and Random Thoughts - Site Home - TechNet Blogs


