Microsoft Flow Security - Plugging Leaks in Flow (Video)
Microsoft Flow security is probably an afterthought for most people migrating to Office 365servicesmicrosoftoffice365cloudmigration Unfort...

Microsoft Flow security is probably an afterthought for most people migrating to Office 365. Unfortunately, there are security concerns around Flow and how it manages data, particularly email. A recent article at Practical 365 discussed how Flow, using user impersonation, makes it incredibly difficult to identify emails being forwarded out of the company domain. The article provided a number of workarounds to disable Flow, but failed to discuss the available tools to secure it.
The issue with Flow is that it offers connectors that allow users to potentially link information between your domain and services that reside outside of your control. The first impulse might be to just disable Flow Licensing. However, in Microsoft’s Flow Q&A documentation they state, “The Microsoft Flow Free license is included only for tracking purposes. As covered in the first section, it is not possible to prevent another person from using Microsoft Flow for individual purposes. Thus, the presence of a Microsoft Flow Free license does not actually grant or remove any capabilities.” Removing licensing from users does not stop them from creating flows!
Microsoft Flow Security Settings
Thankfully, it is a fairly straightforward task to segment and secure your organization’s applications and block Flow’s ability to share company data with unsanctioned applications and services.
Prerequisites:
In order to manage Flow, the user must:
- Have either environment or tenant admin permissions.
- Must have a Microsoft Flow P2 license. ($15/user/month) (Only the person configuring the environment needs this license)
Accessing the Flow Admin Center
The flow admin center can be accessed in two ways:
- Go directly to admin.flow.microsoft.com
- Go to the Office 365 admin center, then:
- Click [More…] in the left-hand menu
- Click [All admin centers] in the drop-down menu.
- Click the Flow icon in the admin center listing.
Setting Up an Environment in Microsoft Flow
One environment will exist by default, named for the primary tenant. This default environment is where all of your user-created flows will exist. You can set company-wide rules in this environment, but it is advisable to create a secondary environment, so you can create exception rules for users who should not be subject to the controls you are about to enable. Similarly, you can create group environments for business units such as HR, Marketing, Leadership, etc or groups of services such as Azure, SQL, Office 365, etc.
By default, you start with the environment view from the Flow Admin Center.
- To create a new environment, click the [+ New environment] link in the upper right-hand corner. You will be prompted to provide:
- Environment name
- Region
- Environment type
Microsoft Flow Data Policies
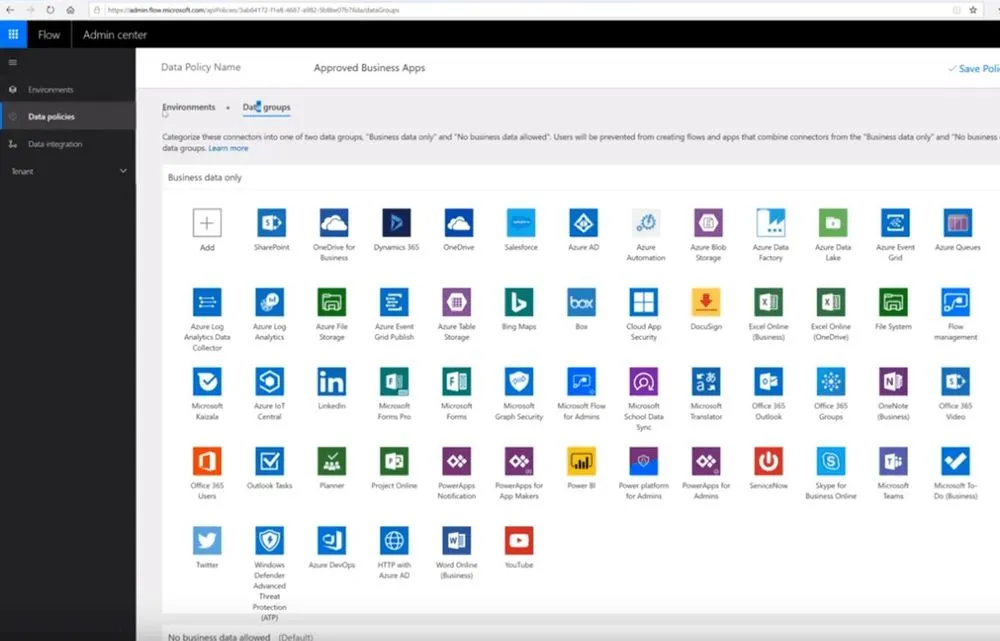
Once your environment is created, you will create data policies for the environment. Flow Admin Center breaks your data groups into two classes; “Business Data Only” and “No Business Data Allowed”. This is slightly misleading at first glance. Data connectors must be placed in “Business Data Only” in order to get blocked from “No business data allowed”. A good way to think of this is that the two boxes are segmented buckets that are isolated from one another. Again, this is relatively simple.
- Click “Data policies” in the left-hand menu
- Click [+ New Policy] in the upper right hand of the screen
- Select where these policies should apply.
- ALL Environments
- ONLY selected environments
- All environments EXCEPT selected
Understand Data Groups in MS Flow
Within the data groups section, you will find two boxes. “Business Data Only” and “No Business Data Allowed”. At first, you may think that everything is locked down, since all available apps are in the “No Business Data Allowed” box. However, since SharePoint and One Drive are in that box, they can freely interact with any other app in that box, since, “no business data is allowed”. Yes, this labeling is a bit confusing. A better way to understand it is to think of the boxes are walled gardens or secure perimeters. Apps in the “Business Data Only” box can freely interact with each other but not “no business data allowed” and likewise with the “No Business Data Allowed” Box.
In order to start securing your company data, add your relevant apps to the Business Data Only box, probably starting with SharePoint, OneDrive, but making sure to include any applications that users interact with customer data from, such as Word, Excel, Outlook, etc…
The User Experience
Even after you set your Microsoft Flow security settings, a user will see all of the apps in Flow. However, if they attempt to connect a “business data only” application with a “no business data allowed” app, they will just get a warning stating “Your flow was created, but is currently suspended since it uses a combination of connectors that conflict with company data loss prevention policies or billing restrictions”. Since the flow is saved, your users can consult with IT leadership to determine if an application should be permitted or not, preventing unintentional shadow IT scenarios.
About Agile IT Tech Talks
Tech Talks are a service for Agile IT’s MSP and CSP clients. Each week we feature a subject matter expert who highlights a feature, platform, or function in a “Demo Heavy, PowerPoint Light” format. The presentation and demo is then followed by a closed Q&A period where clients can engage directly with the expert to have their specific business needs addressed in a private, confidential open forum. If you are interested in the added value Agile IT provides with CSP licensing or managed services, tell us a bit about your environment, and a Cloud Service Advisor will contact you to discuss your available options.


