New Updates for Azure AD Connect Version 1.1.105.0
Version 111050 and beyond February 16 2016 releaseWith the release of version 111050 of Azure AD Connect in mid February some major ch...
Version 1.1.105.0 and beyond (February 16, 2016 release)
With the release of version 1.1.105.0 of Azure AD Connect in mid February, some major changes have come to the application, such as automatic upgrades, reduced sync interval, and modern authentication with two factor authentication enabled. We’ll look at some new updates for Azure AD Connect version 1.1.105.0 and beyond.
Automatic upgrades
Microsoft in the past has pushed regular updates to its Azure AD Connect application, requiring administrators to manually upgrade each time for stability and feature improvements. Now the application/service will automatically upgrade for administrators that install using “Express Settings,” which Agile IT usually does, without any administrative action. Existing installs not on at least version 1.1.105.0 will need to manually update to at least this version to take advantage of this feature.
Reduced sync interval
From inception, Azure AD Connect, and its previous iterations, have all had a 3-hour default sync interval, requiring manual syncs for just about any change as that timeline has proven too long. Modification of this default interval was always a complicated and unsupported configuration. Now the tool has a 30-minute default interval and modification can be done via PowerShell, though anything less than 30 minutes is not supported by Microsoft.
You can view your current sync interval with the following PowerShell command:
Get-ADSyncScheduler 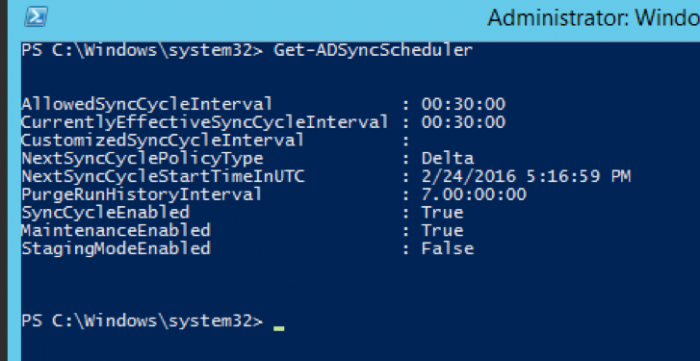
AllowedSyncCycleInterval. The most frequently Azure AD will allow synchronizations to occur. You cannot synchronize more frequently than 30 minutes and still be supported.
CurrentlyEffectiveSyncCycleInterval. The schedule currently in effect. It will have the same value as CustomizedSyncInterval (if set) if it is not more frequent than AllowedSyncInterval. If you change CustomizedSyncCycleInterval, this will take effect after next synchronization cycle.
CustomizedSyncCycleInterval. If you want the scheduler to run at any other frequency than the default 30 minutes, you will configure this setting. In the picture above the scheduler has been set to run every hour instead. If you set this to a value lower than AllowedSyncInterval, the latter will be used.
NextSyncCyclePolicyType. Either Delta or Initial. Defines if the next run should only process delta changes, or if the next run should do a full import and sync, which would also reprocess any new or changed rules.
NextSyncCycleStartTimeInUTC. Next time the scheduler will start the next sync cycle.
PurgeRunHistoryInterval. The time operation logs should be kept. These can be reviewed in the synchronization service manager. The default is to keep these for 7 days.
SyncCycleEnabled. Indicates if the scheduler is running the import, sync, and export processes as part of its operation.
MaintenanceEnabled. Shows if the maintenance process is enabled. It will update the certificates/keys and purge the operations log.
IsStagingModeEnabled. Shows if staging mode is enabled. You can modify all these settings with
Set-ADSyncScheduler. The parameter IsStagingModeEnabled can only be set by the installation wizard.
Starting a manual sync
The scheduler will by default run every 30 minutes. In some cases, you might want to run a sync cycle in between the scheduled cycles or you need to run a different type.
Delta sync cycle
A delta sync cycle includes the following steps:
- Delta import on all Connectors
- Delta sync on all Connectors
- Export on all Connectors
It could be that you have an urgent change which must be synchronized immediately which is why you need to manually run a cycle. If you need to manually run a cycle, then from PowerShell run Start-ADSyncSyncCycle -PolicyType Delta.
Full sync cycle
If you have made one of the following configuration changes, you need to run a full sync cycle (a.k.a. Initial):
- Added more objects or attributes to be imported from a source directory
- Made changes to the Synchronization rules
- Changed filtering so a different number of objects should be included
- If you have made one of these changes, then you need to run a full sync cycle so the sync engine has the opportunity to reconsolidate the connector spaces. A full sync cycle includes the following steps:
- Full Import on all Connectors
- Full Sync on all Connectors
- Export on all Connectors
To initiate a full sync cycle, run Start-ADSyncSyncCycle -PolicyType Initial from a PowerShell prompt. This will start a full sync cycle.
Domain/OU Filtering
Some customers find the need to filter out OUs from syncing with Office 365 for a variety of reasons, be it to keep service accounts out of active users, filter out contractors, etc. The ability to filter out OUs was not natively in older versions of Azure AD Connect and its previous names but was possible through other means. Now this ability is built into the Azure AD Connect application under the customize path of the install and you also have the option to configure filtering post setup.
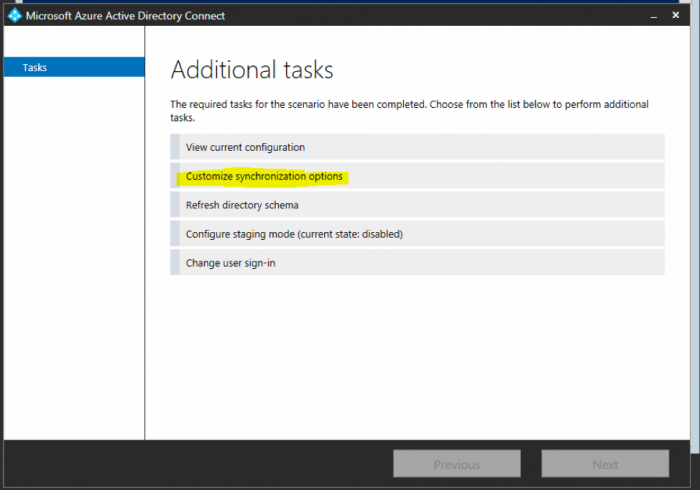
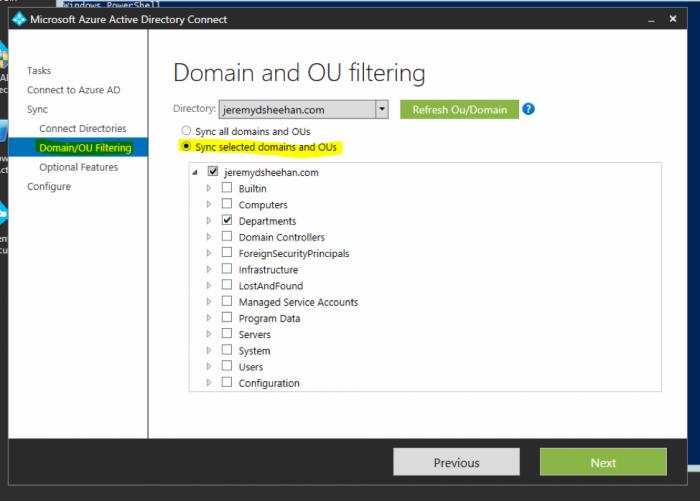
Any OUs you wish to skip sync simply uncheck them here, or check new ones you wish to be synced. The older way of filtering through the misclient will still work but is no longer supported.
Modern authentication
Microsoft recommends that any users who have administrative privileges have strong authentication configured. In the past, the Azure AD Connect wizard did not seamlessly work with multifactor authentication, which as a result made using this feature difficult. With this release, Azure AD Connect now leverages the Azure AD Authentication library (ADAL) and the Modern Authentication protocols that it supports, for sign-in to Azure AD. You can now specify an admin user that has MFA or PIM configured to connect to Azure AD.
Need help managing your cloud environment? Learn more about AgileCover fully managed IT support to find out how we can position your organization for growth in the cloud.
